
Introduction
Finally, the long wait is over, Amazon Elastic Container Service for Kubernetes (Amazon EKS) is now generally available for all AWS customers.
This new service is definitely going to help in our AWS deployments and migrations in coming days. To all those who are looking into deploying EKS, here are the steps I followed to setup the cluster using a custom VPC.
Custom VPC - Why?
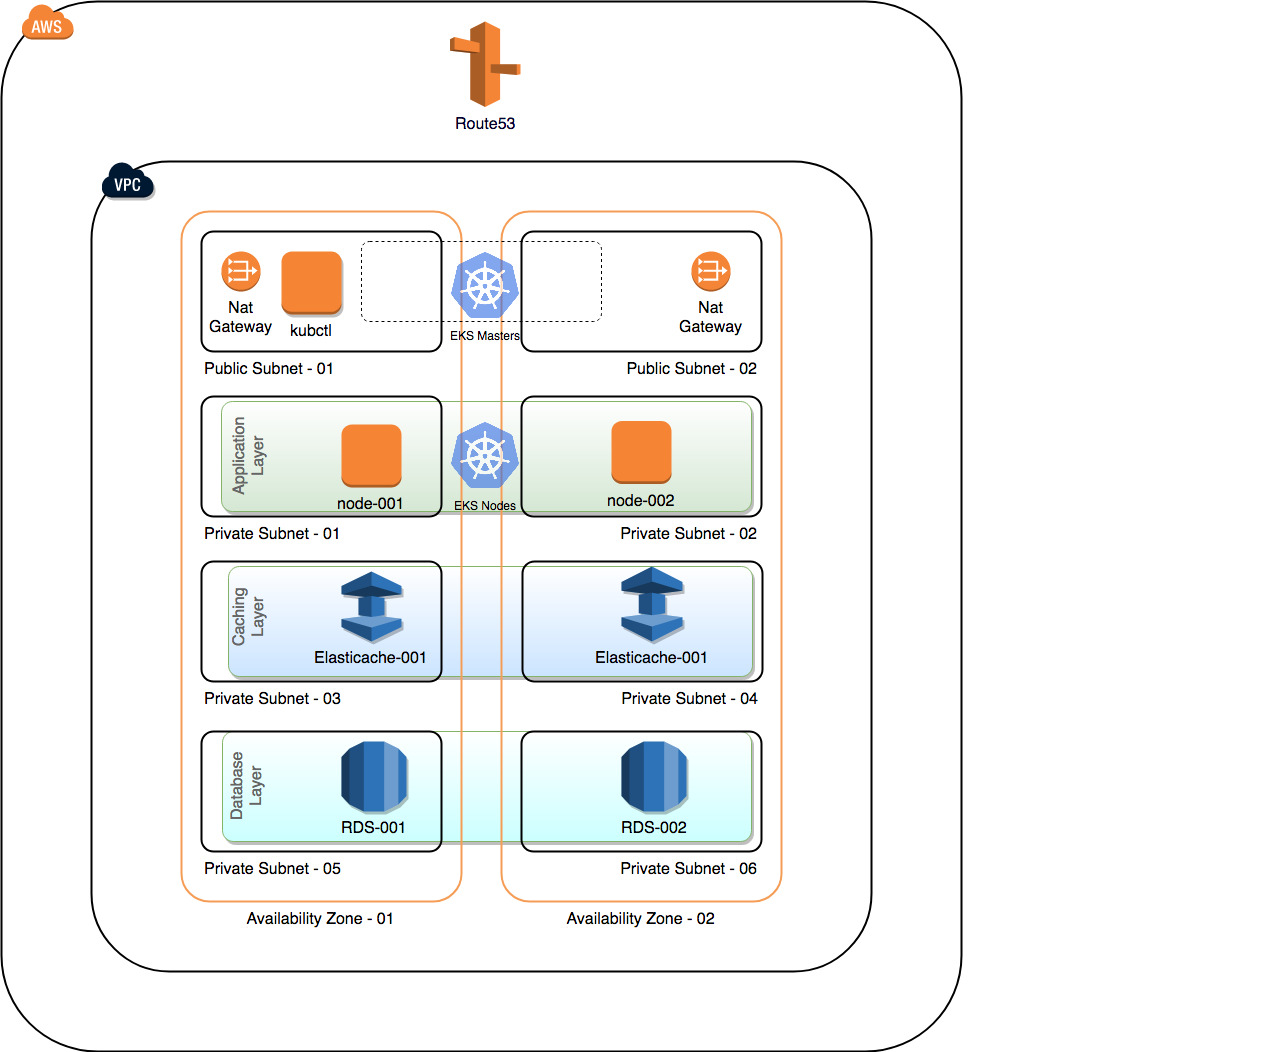
By default, AWS CloudFormation templates provided in EKS Getting started guide will be provisioning a VPC spanning across 3 AZs and there will be only 3 Public Subnets. But it’s recommended to run the worker nodes in Private Subnets and dedicated subnets for your other resources like RDS, ElastiCache etc. Here is a simple diagram of my lab architecture.
10 Steps to provision EKS Cluster
1 Create Key Pair
- Open Amazon EC2 console, Navigate to NETWORK & SECURITY
- Choose Key Pairs > Create Key Pair.
- Download the Key Pair and save it securely.
2 Provision Custom VPC
Based on above architecture diagram, I have created a CloudFormation template and it’s available here. Feel free to use or modify it.
1
 https://gist.github.com/dijeesh/2bc2709009e5cc740d542d263f11068e
- Download and modify the template as per your requirement.
- Open the AWS CloudFormation console
- Create Stack
- Select Upload Template to S3 and choose the template file
- Provide a Stack Name: Eg EKS-LABS-CLUSTER-STACK
- Provide a VPCName Eg EKS_LABS_VPC, this will be used to tag all resources
3 Create an IAM user for EKS Administration
IAM User who creates the cluster is added to the K8 RBAC Authorization table as administrator. Initially, only that IAM user can make calls to API using kubectl. Let’s create a new dedicated IAM user and use it for rest of the steps / Set-up AWS CLI for administration via kubectl.
- Open the AWS IAM console
- Navigate to Groups > Create New Group
- Group Name : Administrators
- Attach Policy : AdministratorAccess
Create Group
- Navigate to Users
- Add User
- Access Type, Select Programmatic Access and AWS Management Console access
- Add user to group: Select Administrators group we previously created.
- Review and Create User.
- Download Passwords and Keys and and store it securely
1
Restrict IAM Access using custom policy Ref: https://docs.aws.amazon.com/eks/latest/userguide/EKS_IAM_user_policies.html
4 Configure kubectl control instance
You don’t have to create a separate instance for kubectl, you can configure it on your local machine itself. Here I have created a small dedicated instance and going to configure kubectl and other tools in it.
- Open Amazon EC2 console
- Create a EC2 instance using AWS Linux 2 AMI
1
2
3
4
# Install Kubectl
curl -o kubectl https://amazon-eks.s3-us-west-2.amazonaws.com/1.10.3/2018-06-05/bin/linux/amd64/kubectl
chmod +x kubectl
sudo mv kubectl /usr/local/bin/kubectl
1
2
3
4
# Install heptio-authenticator-aws
curl -o heptio-authenticator-aws https://amazon-eks.s3-us-west-2.amazonaws.com/1.10.3/2018-06-05/bin/linux/amd64/heptio-authenticator-aws
chmod +x heptio-authenticator-aws
sudo mv heptio-authenticator-aws /usr/local/bin/heptio-authenticator-aws
1
2
3
# install and upgrade python
yum install python3
pip3.7 install awscli --upgrade --user
1
2
3
4
5
6
7
8
9
10
11
12
13
14
# Setup AWS CLI
mkdir /home/ec2-user/.aws/
cat >/home/ec2-user/.aws/config <<EOL
[default]
region = YOUR_AWS_REGION
EOL

cat >/home/ec2-user/.aws/credentials <<EOL
[default]
aws_access_key_id = STEP1_AWS_ACCESS_KEY_ID
aws_secret_access_key = STEP1_AWS_ACCESS_KEY_ID
EOL

chown ec2-user:ec2-user /home/ec2-user/.aws -R
1
Make sure to replace YOUR_AWS_REGION, STEP1_AWS_ACCESS_KEY_ID and STEP1_AWS_ACCESS_KEY_ID
5 Create IAM Role for EKS Cluster
Create IAM role that K8 can assume to create AWS resources
- Open the IAM console at https://console.aws.amazon.com/iam/.
- Choose Roles, then Create role.
- Choose EKS from the list of services, then Allows Amazon EKS to manage your clusters on your behalf for your use case, then Next: Permissions.
- Choose Next: Review.
- For Role name, enter eks-service-role
1
Note down Role ARN for above created IAM Role
At this stage, we are ready to provision our EKS Cluster.
6 Provision EKS Cluster
1
Logout from the AWS Console and re-login using the IAM user we create in first step.
- Open the Amazon EKS console
- Choose Create Cluster
- On Create cluster page,
- Cluster name: Unique name for your cluster
- Kubernetes version: Select Version, By default the latest version will be selected
- Role ARN: Provide IAM Role ARN (Step 4)
- VPC : Select your custom VPC and Choose Public Subnets
- Security Groups : Select SG_EKS_CLUSTER_CONTROL_PLANE
- It will take few minutes to create the cluster.
7 Configure Kubectl
Now let’s create a kubeconfig file for manging the EKS Cluster. Login to your kubectl node we created in step 4 and insert the codeblock to .kube/config
1
2
3
4
5
6
7
8
9
10
11
12
13
14
15
16
17
18
19
20
21
22
23
24
25
26
apiVersion: v1
clusters:
- cluster:
    server: EKS_ENDPOINT_URL
    certificate-authority-data: BASE64_ENCODED_CA_CERT
  name: kubernetes
contexts:
- context:
    cluster: kubernetes
    user: aws
  name: aws
current-context: aws
kind: Config
preferences: {}
users:
- name: aws
  user:
    exec:
      apiVersion: client.authentication.k8s.io/v1alpha1
      command: heptio-authenticator-aws
      args:
        - "token"
        - "-i"
        - "CLUSTER_NAME"
        - "-r"
        - ""
1
Replace EKS_ENDPOINT_URL with your EKS Endpoint URL, BASE64_ENCODED_CA_CERT with certificateAuthority and CLUSTER_NAME with EKS Cluster name. You can get all these details from EKS Cluster Console.
Save the configuration file and execute following commands to use it.
1
2
export KUBECONFIG=$KUBECONFIG:~/.kube/config
echo 'export KUBECONFIG=$KUBECONFIG:~/.kube/config' >> ~/.bashrc
Now test your configuration
1
kubectl get all
If everything is fine, you will get your cluster details :)
8 Launch EKS Worker Nodes
Let’s use CloudFormation template provided by AWS EKS Getting started guide for provisioning Worker Nodes.
- Open the AWS CloudFormation console
- Create Stack
- Specify an Amazon S3 template URL ( https://amazon-eks.s3-us-west-2.amazonaws.com/cloudformation/2018-08-30/amazon-eks-nodegroup.yaml )
- Stack name : Provide a Stack Name
- ClusterName : Enter your EKS Cluster Name
- ClusterControlPlaneSecurityGroup : Select SG_EKS_CLUSTER_CONTROL_PLANE Security Group
- NodeGroupName : Provide a name for Node Group
- NodeAutoScalingGroupMinSize : Minimum number of nodes in ASG
- NodeAutoScalingGroupMaxSize : Maximum number of nodes in ASG
- NodeInstanceType : Node Instance Type
- NodeImageId : Enter AMI ID [ami-0a54c984b9f908c81 (us-west-2), ami-0440e4f6b9713faf6 (us-east-1) ]
- KeyName : EC2 SSH Key Pair (Step 1)
- VpcId : Select our custom VPC
- Subnets : Select Private Subnets labeled EKS_PRIVATE_AZ01, and EKS_PRIVATE_AZ02
It will take some time to provision the instance, This CloudFormation template will provision our EKS Nodes (Worker) in VPC Private Subnets and it will be deployed using AutoScaling Group.
1
Note down NodeInstanceRole IAM  Role ARN Created by the stack
9 Enable worker nodes to join the cluster.
Download configuration map
1
curl -O https://amazon-eks.s3-us-west-2.amazonaws.com/1.10.3/2018-06-05/aws-auth-cm.yaml
1
2
3
4
5
6
7
8
9
10
11
12
apiVersion: v1
kind: ConfigMap
metadata:
  name: aws-auth
  namespace: kube-system
data:
  mapRoles: |
    - rolearn: NODE_INSTANCE_ROLE_ARN
      username: system:node:
      groups:
        - system:bootstrappers
        - system:nodes
Edit the file, and replace NODE_INSTANCE_ROLE_ARN NodeInstanceRole ARN (Ref Step 8)
Apply the configuration
1
kubectl apply -f aws-auth-cm.yaml
10 Done
Alright, Done.
We have Provisioned custom VPC, Provisioned EKS Cluster, Provisioned EKS Worker Nodes, Installed configuration map to enable nodes to join the cluster. At this time you will have a EKS Cluster ready to deploy applications. Verify node status by running following command.
1
kubectl get nodes
References : AWS EKS Documentations
Happy Containerization :)